Christmas Nails: Festive Manicure Ideas To Sparkle This Holiday Season
Are you ready to deck your nails with boughs of holly and make them as merry as the rest of your holiday decor? Christmas nails have become a beloved tradition for many, offering a creative outlet to express holiday cheer right at your fingertips. Whether you're attending festive parties, cozying up by the fireplace, or simply want to add some seasonal sparkle to your everyday look, there's a Christmas nail design perfect for you.
From classic red and green combinations to modern minimalist interpretations, Christmas nail art has evolved into a sophisticated form of self-expression. In this comprehensive guide, we'll explore everything you need to know about creating stunning Christmas nails that will have everyone asking for your nail artist's contact information. Let's dive into the world of festive manicures and discover how you can transform your nails into tiny works of holiday art!
Classic Christmas Nail Colors and Their Significance
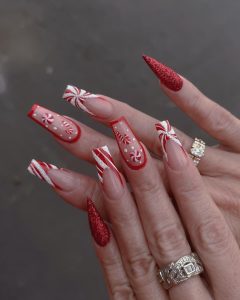
When it comes to Christmas nails, certain colors immediately evoke the holiday spirit. Red remains the quintessential Christmas color, symbolizing everything from Santa's suit to holly berries. A rich, deep crimson or a bright candy apple red can serve as the perfect base for countless Christmas nail designs. Green, representing evergreen trees and wreaths, offers another traditional option that pairs beautifully with red for that classic Christmas combination.
Gold and silver metallics add instant elegance and represent the festive lights and ornaments that decorate homes during the season. These metallic shades work wonderfully as accent nails or when used in nail art designs featuring stars, snowflakes, or geometric patterns. White evokes snow and winter wonderlands, creating a clean canvas for more intricate designs or serving as a standalone color for a minimalist approach.
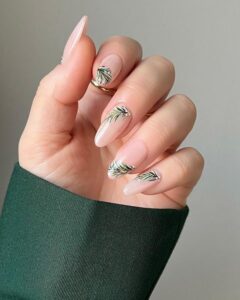
Don't overlook nude and neutral tones, which have gained popularity in recent years for Christmas nails. These subtle shades provide a sophisticated backdrop for delicate gold leaf accents, tiny rhinestones, or minimalist holiday motifs. The beauty of Christmas nail colors lies in their versatility – you can mix and match to create combinations that reflect your personal style while still capturing the holiday essence.
Popular Christmas Nail Art Designs and Techniques
Christmas nail art offers endless possibilities for creativity, from simple accent nails to elaborate hand-painted masterpieces. Glitter gradients create a stunning effect reminiscent of snow falling on a winter evening. This technique involves applying a dense glitter polish at the cuticle or tip and gradually fading it toward the center, creating depth and dimension that catches the light beautifully.
Stamping has revolutionized Christmas nail art, allowing even beginners to achieve professional-looking results. Christmas-themed stamping plates feature everything from intricate snowflakes and reindeer to festive patterns like plaid and candy cane stripes. The process involves applying special nail polish to the plate, scraping away excess, and transferring the design onto your nail using a silicone stamper.
Hand-painted designs showcase the true artistry of nail technicians and ambitious DIY enthusiasts. These can range from simple holly leaves and berries to detailed Santa faces, Christmas trees, or winter landscapes. While this technique requires practice and a steady hand, the results are truly impressive and make for show-stopping Christmas nails that are sure to impress.
Step-by-Step Guide to Creating Your Own Christmas Nails
Creating beautiful Christmas nails at home is easier than you might think! Start with proper nail preparation by removing any old polish, gently pushing back cuticles, and shaping your nails to your desired length and style. Apply a base coat to protect your natural nails and ensure better polish adhesion – this step is crucial for long-lasting Christmas nails.
For a classic Christmas look, begin with two coats of your chosen base color, allowing each coat to dry completely. If you're creating a design with multiple colors, use nail tape or stencils to achieve clean lines and professional-looking results. For example, to create candy cane stripes, apply white polish as your base, then use thin nail tape to section off diagonal stripes before applying red polish.
Adding embellishments takes your Christmas nails to the next level. Apply tiny rhinestones using nail glue or while your top coat is still tacky, creating patterns like Christmas lights or ornament designs. For a snowy effect, use a fan brush to lightly dust white polish across your nails, or create 3D snowflakes using acrylic powder or specialized nail art products. Finish with a high-quality top coat to seal in your design and add brilliant shine that will last throughout the holiday season.
Trending Christmas Nail Styles for 2024
This year's Christmas nail trends are all about combining traditional holiday elements with modern techniques and unexpected color combinations. Minimalist Christmas nails have gained tremendous popularity, featuring subtle nods to the holidays through delicate line work, negative space designs, or tiny metallic accents. Think nude bases with thin gold Christmas tree outlines or a single red dot representing a holiday ornament.
French tip variations have evolved beyond the classic white, with Christmas versions featuring red, green, or gold tips adorned with tiny snowflakes or glitter. The reverse French manicure, where the color appears along the cuticle line rather than the tip, offers another modern twist that works beautifully with holiday colors. Some nail artists are even creating ombré French tips that transition from deep red to bright gold for a truly festive effect.
3D nail art continues to dominate Christmas nail trends, with artists creating raised designs that literally pop off the nail. This can include sculpted Santa hats, 3D snowflakes with crystal centers, or even miniature Christmas trees complete with tiny ornaments. While these designs require professional application, they make a dramatic statement perfect for holiday parties and special events where you want your Christmas nails to be the center of attention.
Professional vs. DIY Christmas Nails: Pros and Cons
When deciding between professional salon services and DIY Christmas nails, several factors come into play. Professional nail technicians offer expertise, high-quality products, and intricate designs that might be challenging to achieve at home. They can create complex nail art, apply extensions for length, and use professional-grade gel polishes that last significantly longer than regular polish – often up to three weeks without chipping.
However, professional Christmas nails come with a higher price tag, typically ranging from $50 to $100 or more depending on the complexity of the design. You'll also need to schedule appointments in advance, which can be challenging during the busy holiday season when everyone wants festive nails. The salon environment also exposes you to others' germs and requires travel time.
DIY Christmas nails offer flexibility and cost savings, allowing you to change your design as often as you like without additional expense. With practice, you can achieve impressive results using kits available online or at beauty supply stores. The main drawbacks include the learning curve for more complex techniques, the time investment required, and potentially shorter wear time compared to professional gel applications. For beginners, starting with simple designs and gradually building skills is the best approach to creating beautiful Christmas nails at home.
Essential Tools and Products for Christmas Nail Art
Building a collection of quality nail art tools will elevate your Christmas nail game significantly. Dotting tools are essential for creating perfect polka dots, berries on holly designs, or the centers of snowflakes. These typically come in sets with various sizes, allowing for different dot dimensions in your Christmas nail art. Striping brushes enable you to paint thin, precise lines for candy cane stripes, tree branches, or intricate patterns.
Nail tape in various colors and metallic finishes helps create sharp lines and geometric designs without the need for advanced freehand painting skills. Stamping kits have become increasingly sophisticated, with plates featuring hundreds of Christmas-themed designs and complete sets including special stamping polishes, scrapers, and silicone stampers. Rhinestones and nail charms in holiday shapes like stars, trees, and snowflakes add dimension and sparkle to your Christmas nails.
For those serious about DIY Christmas nails, investing in a UV or LED nail lamp opens up the world of gel polish, which offers superior durability and shine. Nail art brushes in various shapes and sizes allow for detailed painting work, while nail foil can create stunning metallic effects that mimic holiday wrapping paper or add a touch of luxury to any design. Don't forget practical items like acetone for cleanup, nail tape for perfect French tips, and quick-dry drops to speed up your manicure process.
Maintaining Your Christmas Nails Throughout the Holiday Season
Once you've invested time and effort into creating beautiful Christmas nails, you'll want them to last through all your holiday festivities. Proper maintenance begins with allowing adequate drying time after application – at least two hours for regular polish and the time recommended by your gel polish manufacturer. Avoid activities that might damage your nails immediately after application, such as typing extensively or putting on tight-fitting gloves.
Daily maintenance includes applying cuticle oil to keep your nails and surrounding skin hydrated, which prevents lifting and chipping. Wear gloves when doing dishes or cleaning to protect your Christmas nails from harsh chemicals and excessive water exposure. Touch-up techniques can extend the life of your manicure significantly – keep the same color polish on hand to quickly fix any chips that appear, and consider applying an extra layer of top coat every few days to refresh the shine and add protection.
If you notice any lifting or damage, address it immediately to prevent further deterioration. For gel Christmas nails, avoid picking or peeling, as this can damage your natural nails underneath. When it's time to remove your holiday manicure, use the appropriate removal method for your nail type – acetone soaks for regular polish, and proper gel removal techniques to protect your nail health. With proper care, your Christmas nails can remain beautiful throughout the entire holiday season.
Conclusion: Embrace the Festive Spirit with Stunning Christmas Nails
Christmas nails offer a wonderful way to express your holiday spirit and add some extra sparkle to your seasonal celebrations. Whether you opt for classic red and green designs, modern minimalist interpretations, or elaborate 3D nail art, there's a Christmas nail style perfect for every personality and skill level. The key is to have fun with the process and choose designs that make you feel festive and confident.
Remember that Christmas nails don't have to be perfect to be beautiful – sometimes the most charming designs come from simple, heartfelt attempts at holiday cheer. Whether you visit a professional nail technician or experiment with DIY techniques at home, your Christmas nails will surely become a conversation starter and a delightful addition to your holiday look. So gather your favorite holiday colors, unleash your creativity, and let your fingertips shine as brightly as the Christmas lights this season!